Inhaltsverzeichnis
Toradex Easy Installer
The Toradex Easy Installer is Toradex's recommended option for flashing images onto their modules. The method described below loads the installer into RAM, boots from there and allows to flash a new image. We were currently not able to boot from our current image into the Toradex Easy Installer sitting on a USB stick, see Toradex Easy Installer on USB.
Getting Toradex Easy Installer
You need the Colibri evaluation module, see Colibri Evaluation Board from Toradex. Follow instructions on Loading Toradex Easy Installer to get the installer and load it via USB OTG into the RAM. First, you have to enter recovery mode, see Using a command in the bootloader. If there is no longer any bootloader on the board, follow instructions under Using hardware mechanism. Next, load the installer with the instruction given further down on the same website unter Load Toradex Easy Installer through the USB OTG interface. It will now automatically boot into the Toradex Easy Installer.
Installing an Image
You will need a VNC client installed to connect to the installer. For Ubuntu:
sudo apt install tigervnc-viewer
Then connect to the installer with
vncviewer <ip address>
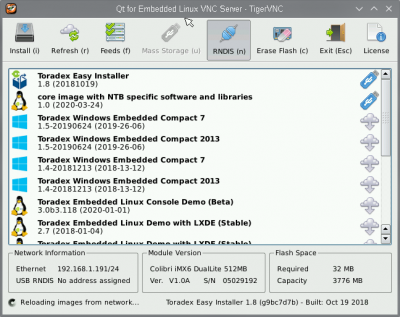
You can get the ip address from the Easy Installer command line with ip a. The following window should appear:
Now select the desired image and click install.
Images Feeds
Images can be browsed on the Images Page. By adding the webserver address provided on the Images Page to the feeds, the images can be installed directly over the web.
Image not showing up
If the Installer does not show the image on the SD Card/USB try the refresh button in the menu bar at the top.
Enable Torizon Beta images
The Toradex CI Server can be enabled under „feeds“ in the menu bar. After a refresh this yields access to Toradex's work in progress and daily builds. E.g. Torizon with RT kernel.
Toradex Easy Installer Image Format
Unlike the legacy images that needed to be flashed explicitly, this „image“ is a collection of files in a folder that can simply be copied to a SD Card or USB stick. They will automatically be recognised by the Toradex Easy Installer if they are present at boot.
Providing an Image via http
The Toradex Easy Installer can load images from a web server using http. All that is needed is a web server hosting the files and a file describing what images there are (image_list.json) in the web root.
Example image_list.json, assuming that the image of interest is in a directory called cb20. This is the same directory as produced by yocto when building for the NTB CB20 in build/deploy/images.
{
  "config_format": 1,
  "images": [
        "cb20/image.json"
  ]
}
Adding the server to the Toradex Easy Installer Image
The server can be added to the Easy Installer Image by adding a tezi_config.json file to it. A sample is provided below:
{
	"config_format": 1,
	"image_lists": [
		"http://<hostname>/image_list.json"
	]
}
Alternatively, it can also be added by clicking on the *feeds* button in the menu bar..
