Infoportal
Dies ist eine alte Version des Dokuments!
Create deep projekt (Hello World for MPC5200)
This step by step guide describes how to create a first deep project with the Phytec phyCORE-MPC5200B-tiny board.
- Start eclipse, choose a workspace and switch to the deep perspective as described here.
- Start the new project wizard by clicking File → New → Project…
- Open now the Deep category and select Deep Project. Click Next. \\

- On the Target Library wizard page you have to choose where the deep target runtime library is located. If you're working on a NTB-PC, you can simply leave the box Use default library path checked and click Next. If you're working on your private PC or notebook, you have to browse to the location where you've installed the library.

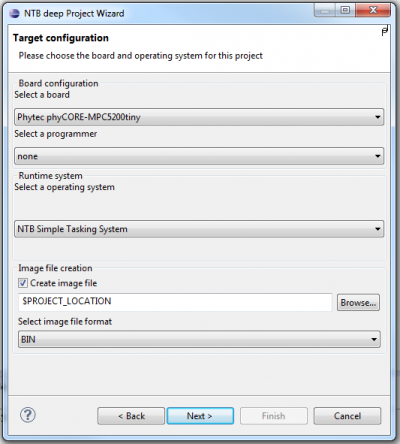
- On the Target Configuration page select the following options:
- Select a board: Phytec phyCORE-MPC5200B-tiny
- Select a programmer: <none>
- Select a operating system: NTB Simple tasking system
- Select the checkbox Create image file and choose the location to save the image file and the desired image file format. Default save location is the project folder.
- On the Projectname page:
- Choose any project name (no spaces, no „umlauts“)
- ✔ use default location

- Create the project by clicking Finish
- The empty project will show on the left side in the package explorer.

- By right-clicking on the source folder src in the package explorer choose New → Package and add package name ch.ntb.stud.yourName.helloworld.

- By right-clicking on the newly created package choose New → Class and enter class name HelloWorld.
- Open class and enter source code:
package ch.ntb.stud.yourName.helloworld;

import java.io.PrintStream;
import ch.ntb.inf.deep.runtime.mpc5200.driver.UART3;

public class HelloWorld {
	static {
		// Initialize UART (9600 8N1)
		UART3.start(9600, UART3.NO_PARITY, (short)8);

		// Use the UART3 for stdout
		System.out = new PrintStream(UART3.out);

		// Print a string to the stdout
		System.out.println("Hello, World");
	}
}
- Open project file: HelloWorld.deep
- Add the newly created class to rootclasses:
project { libpath = "I:/deep/lib"; rootclasses = "ch/ntb/stud/yourName/helloworld/HelloWorld"; } - Connect the hardware to an Abatron BDI and with a serial cable to the PC. Power on the target device and the BDI.
- Open View Dialog under Window → Show View → Other….

- In the category Terminal mark Terminal and confirm with OK.

- Under Connection Type select Serial and choose settings according to the settings of the UART on the target from paragraph 9 above. Check the port number with your operating system.

- Mark project file „HelloWorld.deep“, either by right-clicking Run As → Deep Application

or with pulldown menu of the run-button Run As → Deep Application

will the programm be compiled and linked.  Download the generated file to the target and start your programm
- The Serial Terminal shows Hello, World.


